Since full-size keyboards are where I find the most comfort, perhaps it's worth describing what aspects of their design I feel are important to address in my efforts. While that discussion is likely going to suggest a mechanical keyboard as a central ideal, I don't think that any particular mechanism is as important as what properties it can impart to the product. Bear in mind that much of this is merely my preference.
 |  |
| An old XT keyboard, showing cylindrical crowns and overall contour. | |
While an unfamiliar laptop key layout may certainly conflict with motor memory, even a familiar layout becomes difficult to use without some form of orienting information. It is the physical geometry of the keyboard which provides spatial cues to reinforce and maintain the accuracy of learned motions when moving from key to key. Consider a similar sensorimotor task; it's easy to walk through a familiar room in darkness if you can occasionally touch known surfaces along the way. Doing the same without any references is an exercise in error accumulation. In terms of a continuous process, these forms of feedback facilitate the error determination necessary for error correction to be possible; they allow the control loop to be closed.
The most obvious and universal orienting features are identifier bumps. They are usually only located on the F and J keys, as well as the numpad 5 key (on keyboards with a numpad). Bumps are one of the few physical features of keycaps that people can easily customize. While self-adhesive bumps can be bought for this purpose, other methods such as glue are common. Custom bumps are especially useful in emphasizing keys associated with certain keyboard commands.
While the typical keyboard bumps are a mechanism to orient hand position within a general area of the keyboard, it is the feedback provided by the shape of the keycaps and the overall contour of the keyboard itself which reinforces the discreteness of all keys. The center of each key can be emphasized by making the crown of the keycap slightly concave, or by making the crown smaller than the pitch distance between key centers. Providing strong centering cues helps maintain spatial awareness and helps to reduce the tendency for edge strikes and two-key strikes. Many keyboards have the rows laid out in either a curved or linear stairstep fashion, a feature which both adds to the distinctness of the rows and aids in comfortably reaching the upper rows.
 |
| You could at least pretend that ergonomics matter. |
In all the time I've spent using this laptop, nearly every minute has been steeped in the thought that there must be a way to improve its keyboard. As per the mentioned limits of practicality, there is little I can do to alter the keystroke or overall contour. While I can't alter the layout, perhaps I can add some extra identifiers. Adding various forms of spatial cues to the keycaps should be possible, though there are some limitations. Of course, there's the limitation of the distance between the keyboard and screen when the laptop is closed. It might also be desirable to make sure any alterations are removable; after all, this is likely to require some experimentation.
The First Attempt at a Solution
My first thought was to use adhesive to add identifier bumps to certain keys. After some thought, I came to the prior conclusions regarding more general spatial awareness reinforcement, ultimately deciding that a centering mark of some sort should be added to the most-used keys. My thought was to simulate the effect of a concave keycap crown by adding a circular ridge on each key. I could add ancillary bumps or ridges either for location, identification, or for avoidance.While a finalized design could be implemented using epoxy, I opted to prototype my ideas using a conformal coating made from clear Dap Sidewinder thinned with xylene. This can be thinned to an appropriate consistency and provides a smooth, self-leveling finish. It can also be completely removed once dry by simply redissolving in xylene; though in this case, sound material could be picked/peeled off cleanly without solvent. It may also be possible to use something like E6000 if thinned appropriately.

One also should consider the materials used. Many adhesives and coatings will degrade when in constant contact with skin oils. While I chose this coating for prototyping, it is wholly unsuited for long-term use. After a week or so, it will begin to become sticky and will eventually get smeared everywhere. Other products like E6000 will likely do the same on a longer timeframe, and I would expect the same of almost every common adhesive other than epoxy.

Placing my hands in the rings on home row felt awkward -- as if they're too straight. Certainly, the wear marks on my main keyboard suggest that my fingertips naturally rest in an arc across the keys. It followed that the landing points were generally centered laterally, but otherwise varied depending on what was most comfortable for a given finger. I switched the circular glue rings out for elongated rectangular glue rings and noted a marginal improvement. I felt that it was ultimately impractical to achieve much more with such a low-profile method.
The Development of Keycap Veneers
Finding myself idle on my laptop away from home, I dared to spend some time on what I'd presumed would surely be a huge waste of time. I figured I'd whip up a parametric model for 3D-printed keycaps. The idea was to print some caps (if they would print flat and thin), clean them up (easier said than done), and glue them like veneers on top of the existing keys. The modelling was done in OpenSCAD, a simple and enjoyable script-based parametric 3D CAD tool. I conjured up several different variations on crown geometry, printing and testing along the way.// //////////////////////////////////////////////////////
// keycap veneers for shitty flat laptop keyboards
// cylinder cuts only strongly enforce x-positioning
// this allows fingertips to rest in a more natural arc across home row
// and may be more comfortable on keys which require more reaching or are otherwise habitually struck off-center
// they're also easier to make smooth (easier to print without fuzz, also easier to scrape/sand by hand)
// spherical cuts reinforce y-pos more than cylinder cuts do (important on flat kb)
// elliptical cuts are a compromise especially suited to flat profile kb
// proportions aren't fixed. some things require manual adjusting
// //////////////////////////////////////////////////////
// RENDERING & MULTIPART LAYOUT
nf=100; // facet number (~50 for speed; ~200 for printing)
Nx=4; // number of caps to tile along X-axis
Ny=2; // number of caps to tile along Y-axis
tilegap=2; // gap between tiles
// //////////////////////////////////////////////////////
// BASIC KEYCAP GEOMETRY
h=17; // keycap height (in key plane)
w=17; // keycap width (in key plane)
th=1.7; // maximum cap thickness (limited by kb-screen gap)
th_min=0.3; // minimum cap thickness (limited by print strength)
draftx=45; // draft angle (vertical taper on R,L faces)
drafty=45; // draft angle (vertical taper on T,B faces)
cr=3; // corner radius
// //////////////////////////////////////////////////////
// PRIMARY RELIEF CUTS
// sphere & cylinder mimic legacy alpha key designs
// lcylinder is the transverse version of 'cylinder', for wide keys
// wcylinder is a double-cylindrical hull, for wide keys
// sausage is a double-spherical hull, for wide/tall keys
// ysausage is the same as 'sausage', but each sphere location can be independently offset
// bumps is a series of spherical bumps (used as an avoidance indicator)
// using 'none' will produce a flat keycap
style="sphere";
// these parameters may need tweaked when geometry is changed significantly
drc=20; // relief cut radius for cylinder styles
drs=20; // relief cut radius for sphere & sausage styles
// the following options only apply to spherical cuts
osx=0; // offset x
osy=0; // offset y
osz=0; // offset z
scaley=1.3; // stretch factor (elliptical cut)
// the following options only apply to ysausage cuts
os1=-.5; // y-offset for top sphere
os2=-3; // y-offset for bottom sphere
// the following options only apply to 'bumps'
brad=1; // bump radius
bdepth=0.7; // bump depth
blayout=[3,4]; // number of bumps [x,y]
// //////////////////////////////////////////////////////
// ADDITIONAL FEATURES
// bevel produces a single beveled edge (e.g. for bottom-row keys)
// multiple bevels can be specified (e.g. ["top","bottom"])
bevel="none"; // bottom top left right or none
bevangle=10; // angle of beveled face
bevhos=0.6; // height offset of bottom edge of bevel
// cuts can be made asymmetric so that a single cut spans multiple keys
// this allows certain keys to be grouped by touch (e.g. groups of four F-keys)
lowside="none"; // right left both or none
// identifier position may be in the center or bottom edge
identifier="none"; // center edge or none
idw=0.5; // identifier width
idl=5; // identifier length
idh=0.95; // identifier height WRT cap height (used for 'edge')
idhc=0.5; // height used for "center"
// //////////////////////////////////////////////////////
// //////////////////////////////////////////////////////
// THE MAGIC
module cap(){
color("dimgray")
render(){
linear_extrude(height=th,scale=[1-2*th*tan(drafty)/w,1-2*th*tan(drafty)/h]){
hull(){
translate([(w/2-cr),(h/2-cr),0])
circle(r=cr,center=true,$fn=nf/5);
translate([-(w/2-cr),-(h/2-cr),0])
circle(r=cr,center=true,$fn=nf/5);
translate([(w/2-cr),-(h/2-cr),0])
circle(r=cr,center=true,$fn=nf/5);
translate([-(w/2-cr),(h/2-cr),0])
circle(r=cr,center=true,$fn=nf/5);
}
}
}
}
module relief_bumps(){
render(){
difference(){
translate([-0.6*w,-0.6*h,th-bdepth])
cube(1.2*[w,h,brad]);
union(){
for (m=[1:blayout[1]]){
for (n=[1:blayout[0]]){
translate([-(w-w/blayout[0])/2+w/blayout[0]*(n-1),-(h-h/blayout[1])/2+h/blayout[1]*(m-1),th-brad])
sphere(r=brad,center=true,$fn=nf/5);
}
}
}
}
}
}
module relief_spherical(){
render(){
translate([osx,osy,drs+th_min+osz]){
sphere(r=drs,center=true,$fn=nf);
if (lowside=="right" || lowside=="both")
translate([h/2+osx,osy,0])
rotate([90,0,90])
cylinder(r=drs,h=h,center=true,$fn=nf);
if (lowside=="left" || lowside=="both")
translate([-h/2+osx,osy,0])
rotate([90,0,90])
cylinder(r=drs,h=h,center=true,$fn=nf);
}
}
}
module relief_cylindrical(){
render(){
translate([0,0,drc+th_min]){
rotate([90,0,0])
cylinder(r=drc,h=h+1,center=true,$fn=nf);
if (lowside=="right" || lowside=="both")
translate([h/2,0,0])
rotate([90,0,90])
cube([drc*2,drc*2,h],center=true);
if (lowside=="left" || lowside=="both")
translate([-h/2,0,0])
rotate([90,0,90])
cube([drc*2,drc*2,h],center=true);
}
}
}
module relief_cylindrical_long(){
render(){
translate([0,0,drc+th_min]){
rotate([90,0,90])
cylinder(r=drc,h=w+1,center=true,$fn=nf);
}
}
}
module relief_cylindrical_wide(){
render(){
translate([0,0,drc+th_min]){
rotate([90,0,0])
hull(){
translate([(w-h)/2,0,0])
cylinder(r=drc,h=h+1,center=true,$fn=nf);
translate([-(w-h)/2,0,0])
cylinder(r=drc,h=h+1,center=true,$fn=nf);
}
if (lowside=="right" || lowside=="both")
translate([h/2,0,0])
rotate([90,0,90])
cube([drc*2,drc*2,h],center=true);
if (lowside=="left" || lowside=="both")
translate([-h/2,0,0])
rotate([90,0,90])
cube([drc*2,drc*2,h],center=true);
}
}
}
module relief_sausage(){
render(){
translate([0,0,drs+th_min]){
hull(){
translate([(w-h)/2,0,0])
sphere(r=drs,center=true,$fn=nf);
translate([-(w-h)/2,0,0])
sphere(r=drs,center=true,$fn=nf);
}
if (lowside=="right" || lowside=="both")
translate([h/2,0,0])
rotate([90,0,90])
cylinder(r=drs,h=h,center=true,$fn=nf);
if (lowside=="left" || lowside=="both")
translate([-h/2,0,0])
rotate([90,0,90])
cylinder(r=drs,h=h,center=true,$fn=nf);
}
}
}
module relief_ysausage(){
render(){
translate([0,0,drs+th_min]){
hull(){
translate([0,os1,0])
sphere(r=drs,center=true,$fn=nf);
translate([0,os2,0])
sphere(r=drs,center=true,$fn=nf);
}
if (lowside=="right" || lowside=="both")
translate([0,w/2,0])
rotate([90,0,0])
cylinder(r=drs,h=h,center=true,$fn=nf);
if (lowside=="left" || lowside=="both")
translate([0,-w/2,0])
rotate([90,0,0])
cylinder(r=drs,h=h,center=true,$fn=nf);
}
}
}
module relief_bevel(){
union(){
for (i=bevel){
if (i=="top")
translate([0,h/2,th_min+bevhos])
rotate([bevangle,0,180])
translate([0,h/4,w/2])
rotate([90,0,0])
cube([w,w,h/2],center=true);
if (i=="bottom")
translate([0,-h/2,th_min+bevhos])
rotate([bevangle,0,0])
translate([0,h/4,w/2])
rotate([90,0,0])
cube([w,w,h/2],center=true);
if (i=="right")
translate([w/2,0,th_min+bevhos])
rotate([bevangle,0,90])
translate([0,w/4,h/2])
rotate([90,0,0])
cube([h,h,w/2],center=true);
if (i=="left")
translate([-w/2,0,th_min+bevhos])
rotate([bevangle,0,-90])
translate([0,w/4,h/2])
rotate([90,0,0])
cube([h,h,w/2],center=true);
}
}
}
module drawcap(){
difference(){
cap();
if (style=="sphere")
if (scaley!=1)
scale([1,scaley,1])
relief_spherical();
else
relief_spherical();
if (style=="cylinder")
relief_cylindrical();
if (style=="lcylinder")
relief_cylindrical_long();
if (style=="wcylinder")
relief_cylindrical_wide();
if (style=="sausage")
relief_sausage();
if (style=="ysausage")
relief_ysausage();
if (style=="bumps")
relief_bumps();
if (bevel!="none")
relief_bevel();
}
if (identifier=="edge")
translate([-idl/2,-idw/2-h*0.34,th_min])
cube([idl,idw,th*idh-th_min+0.001]);
else if (identifier=="center")
translate([-idl/2,-idw/2,th_min])
cube([idl,idw,th*idhc-th_min+0.001]);
}
module tilecaps(){
color("dimgray"){
for (m=[1:Ny]){
translate([0,(m-1)*(h+tilegap),0]){
for (n=[1:Nx]){
translate([(n-1)*(w+tilegap),0,0]){
drawcap();
}
}
}
}
}
}
tilecaps();
Much of the core focus of these experiments stems from the lessons of the glue ring experiment; that is, finding the balance between the axial components of the crown geometry. The equivalent analog for the circular glue ring is of course a spherically concave crown. By contrast, many keyboards such as the Model M have cylindrically concave crowns. While the spherical crowns provide constraint cues both laterally (side to side) and transversely (across the rows), cylindrical crowns only provide strong constraint laterally. Much like using elongated glue rings, this allows for more variation of finger placement in the transverse direction without affecting comfort. While the cylindrical shapes are certainly easier to deburr and finish than spherical ones, the overall flatness of the keyboard and the tendency to use the laptop in awkward positions without a desk left me wanting more transverse constraint than they could provide. After all, while the Model M uses cylindrical crowns, it also has a significant and unambiguous height difference between rows. The solution was simply a deep ellipsoidal crown contour. Using atypically deep crowns helps compensate for the flatness inherent to a laptop keyboard, and generally provides more constraint overall. A few quick tweaks were required to find what I felt was a good balance. Compared to either spherical or cylindrical reliefs of a similar depth, the final ellipsoidal crown allowed a dramatic improvement in speed, accuracy, and comfort within the alpha keys.
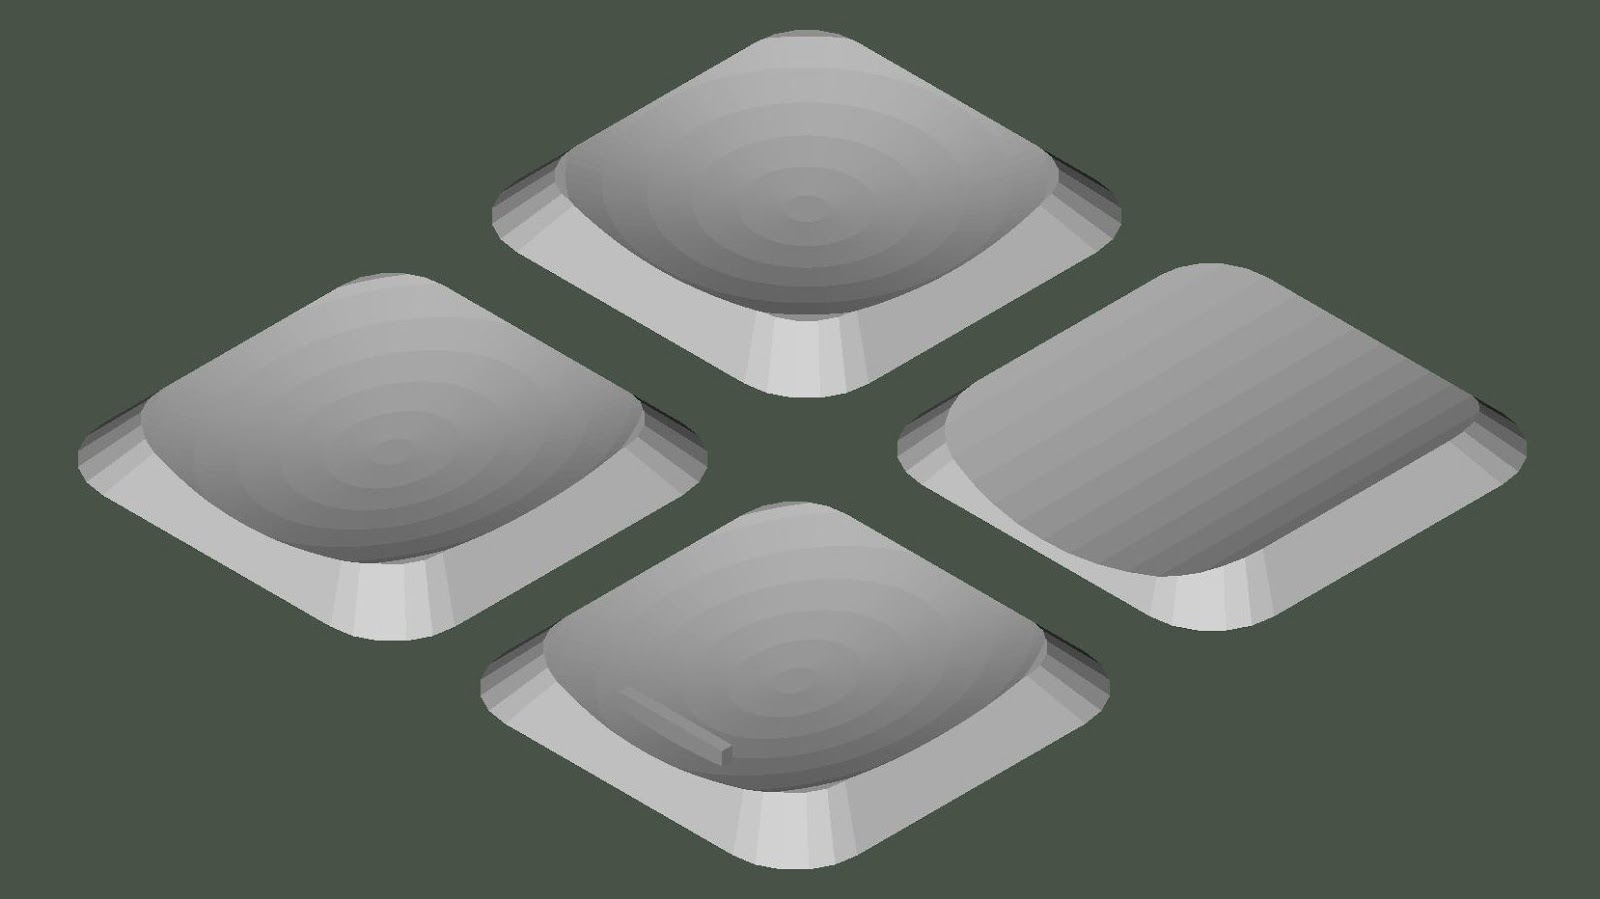 |
| Caps with spherical, cylindrical, and ellipsoidal crowns (and an identifier bump) |
The F-keys are grouped into blocks of four, with each group sharing an elongated concave relief. This addresses the fact that the keys are not spaced or located as they are on a standard keyboard. Only ESC and DEL have their own spherical relief.
Keys which I rarely use, or keys which are otherwise hit accidentally need some sort of avoidance identifier. I opted for a lower-profile cap with a grid of bumps. While it makes for frustrating print cleanup, it's an effective solution.
Other keys were given either shallow concave reliefs or simple bevels. In this way, they are brought up to a comparable height with the other modified keys, even if they otherwise do not require any particular improvement.
 |
| Other cap types for function-row and numeric-row keys |
Improving the finish beyond that is difficult. As the parts are very thin, heat polishing (flame or hot air) doesn't really work. The features are either destroyed, or the part curls and requires restraint -- leading to more marring. Solvent polishing PLA is not really a thing. No, acetone, MEK, and ethyl acetate don't work. They might slightly soften and deglaze the part, but they will not dissolve the surface enough to allow it to reflow. I do not know of any other solvents that would, but if there were one, I have a feeling that the parts would be so thin that they would tend to curl anyway.
 |
| Sanded, fuzzy caps temporarily affixed during fitting |
I ended up opting to just coat the caps, though I know that coatings on a keyboard are likely going to eventually fail. I figured that my best bet was either polyurethane or a good clear acrylic. I didn't feel like applying the poly with a brush or sprayer, so I just used an aerosol acrylic spray. No, I did not just spray the keys in-situ. I used double-sided tape to hold them down to a waste board when spraying.
 |
| ||
| The keycaps after a sloppy spray job. It feels better than it looks. | |||


Final Thoughts
The keyboard as modified has proven to be about as good as a laptop keyboard can possibly be. The height is much more comfortable, the alpha keys are distinct from surrounding keys. The identifier bumps are distinct, and I added a couple extra where I wanted them. The finish isn't very pretty, but beauty isn't necessary here.If you read all that blather without losing interest or the will to live, I should congratulate you. Even I had a hard time enduring it.
I flipping hate chiclet keyboards. I still have a 2010 Lenovo x220 just because of the keyboard. Your post has inspired me I might yet make a solution for myself. Thanks for sharing
ReplyDelete